Line Types
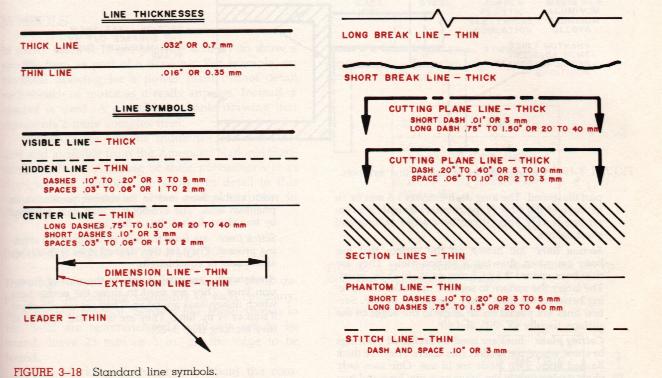
Drawings are made of a variety of lines. They vary in thickness and shape. Line symbols help people reading the drawing to interpret what is meant. The line standards described are part of the American National Standards Association (ANSI).
Visible (Object) Lines: are used to indicate all visible edges that are seen when looking at an object. The symbol is a solid line.
Hidden Lines: show surfaces that are not seen when you look at an object. They are indicated with a thin dashed line.
Dimension Lines: are used to show the extent of a dimension or a particular size. They are solid lines with an arrowhead on each end.
Leaders: is a special form of dimension line. It connects a dimension or note to the drawing.
Extension Lines: are used with dimension lines. They extend a point out from a view to which the dimension line refers. They are solid lines.
Center Lines: are used to locate geometric axes. They are thin lines made of long and short dashes.
Section Lines: are drawn on the surface that has been cut when drawing a section view. They are thin lines spaced evenly apart.
Cutting Plane: lines are used on sectioned drawings to show where the section was taken. They are thick dashed lines. They usually end with an arrow pointing in the direction of sight used to make the section.
Phantom Lines: are used to show the location of a part that moves. The part is drawn in one position with visible lines and in its rotated position with phantom lines.
Arrowheads: are small points on the ends of dimension lines. They are used to show the points from which dimensions are taken.
Symbols
In many cases it is not possible actually to draw a specific item as part of a drawing. For example an electrical drawing for a power plant cannot detail each switch or motor as it really appears. Instead, a symbol is used. A symbol is a simple drawing that represents a more complex item. Symbols for various industries are standardized and available from the American National Standards Institute (ANSI).
Last Updated Sept. 17/99