Projecting Views
[CF, TL, COM, CW]
Orthographic projection is the system of representing objects by using more than one view to define the object. There are actually 4 methods of orthographic representation. In this course you will be studying and using the Third-Angle Projection method of representation. Third-Angle Projection is the most widely used method today.
The Third-Angle projection method is an orthographic representation in which the object to be represented and seen by the viewer appears behind the coordinate viewing planes on which the object is orthographically projected.
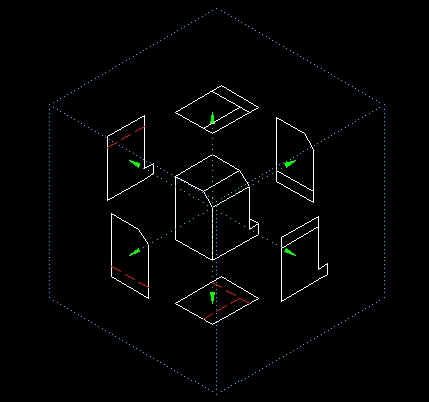
An easier way to think of this method of projection is to imagine viewing the object and its various views through a glass box. In fact, third-angle projection is sometimes referred to as the glass-box method.
Each face of the box represents one of
the six different planes of projection

Third Angle (glass-box) Viewing Planes
Using this method, each view is projected onto its respective viewing plane. Each viewing plane is referred to as a plane of projection. The six principal planes of projection are: front, top, bottom, left side, right side, and back. In determining how the particular view will look (on the plane of projection), imagine yourself looking at the object through each side of the glass box.

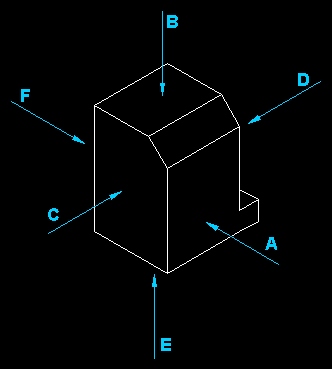
Object with Viewing Directions Indicated
| View in Direction | View From |
| A | Front |
| B | Top |
| C | Left |
| D | Right |
| E | Bottom |
| F | Back |
Generally not all of these projections are used in drawings. In determining the number of projections to use, the rule of thumb is include only as many views that are needed to represent the object accurately.
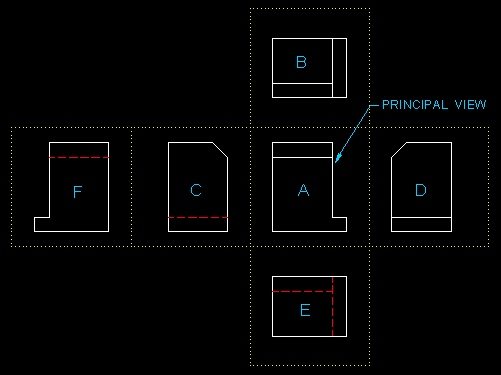
When laying out your various views on your drawing, start with the Principal View. The principal view is the view that shows the most about the product. It is usually the longest view and shows the major shape or profile. Sometimes it may be difficult to determine which view should be used as the principal view. In situations such as this, use your own discretion. This principal view is then designated as the Front View.
After your front view is selected, imagine folding out each flap of the box towards the front view.

All 6 Orthographic Views Positioned Correctly on Drawing Surface
Last Updated June 6/2001